|
|
"We are two, have no network, and want to play on my PC at home" |
Well, great! No problem at all...
* Windows users:
There is a specific installer for Windows : download it there and run the installer. After completion it creates a shortcut on the desktop that you can use to start the game. Note that there are 3 .exe files created in the installation folder, in order to be able to start a stand-alone Slime server, and autonomous Slime bots.
* Non Windows users:
The first thing to do after downloading the zipfile available here is to uncompress it in a location you are familiar with : for example in your applications folder. In that location, you should find 2 jarfiles (*.jar) and some other stuff we won't care for now... Good, now we'll try to run one of those 2 jarfiles : SlimeClient.jar
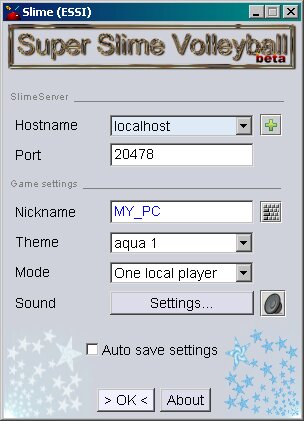
See the section Running a Jarfile to start SlimeClient.Anyway, something like this should come up on the screen:
This first screen lets you configure all the settings for Slime :
As you have no network, you must keep "localhost" in the server hostname section. The value for "port" is not very important for us, try to change it only if you encounter connection related problems. In order to have 2 players on the same machine, select "Two local players" in the "Mode" list. This should have an effect on the contents of the window, adding a few elements. Fill in the 2 fields "Nickname" and "Nick plyr 2" with your and your mate's name (it's your alias in the game).
It might look like this:
Slime uses the keyboard to get players input and controls : click on the small button aside your nickname's field to open a panel letting you choose your keys. To assign a key to an action, simply click in the corresponding area, and type on the key you want to be assigned. Repeat the operation for the second player.
The windows may now look like:
Now click on the "Settings" button in the "Sound" section to develop a new panel : select a suitable Midi Device to produce the sound effects of the game ; in order to have the best sound quality, select preferably another device than "Java Midi Synthesizer" which is slower than an effective hardware device that your soundcard may include. Use the scrollbar to set the volume of sound.
Screenshot :
Finally, don't forget to check the "Auto save settings" box so that all the parameters are saved for the next time.
Now just click the "Ok" button to continue. Normally there should be a popup message asking you if you want to start a SlimeServer :
Select "Yes".
A new window should pop-up after a few instants, followed by another.
This one is the Slime server that controls the game (incl. speed and reset) :
To see how to change the Slime server's settings, please see the Super Slime Volley Ball Server section.
Now we don't have to worry for the server since it is stand-alone.
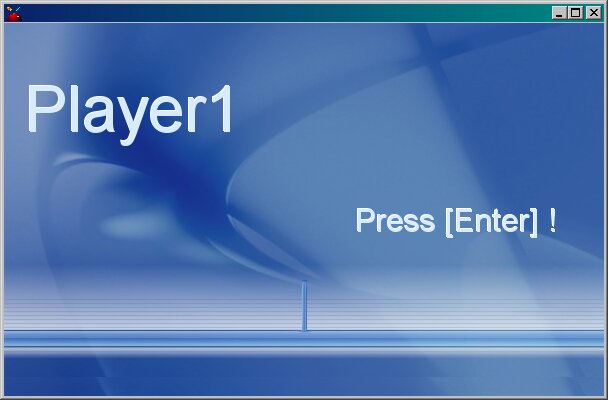
The other window gives some info about the game status and should look like that :
The info are self-describing, and what you have to do now is to choose a team for each player : Team 1 are always located on the left part of the playground, as Team 2 are always located on the right.
As you are only 2 players, choose one different Team for each player (or you'll wait indefinitely for an opponent!) The order of the buttons is the same as in the first dialog where you entered your nicknames (e.g. the top 2 buttons are player 1's choice and the bottom ones are player 2's choice).
Once the team chosen, the window changes once again and we're almost ready to play!
At this point you've probably noticed a small window attached to the top-right corner of the main window:
This is what we call : the Monitor. It shows the players lists for each team, as well as their status and the current scores. It is pretty useful to see which players are connected and what their statuses are. Note that it can be hidden through the menu.
Now that everybody is ready, we can start! To do so, press Enter. It should go on like that:
Ok, ready to play! Now, please see the Super Slime Volley Ball play instructions to get hints...
Conception: Flo 2003,